Links
Frameworks used
The 2D robot simulation program is written in Python 3.5 and uses mainly GUI module kivy and its counterpart for game logic the kivent module.
Using kivent module complex physics, graphics, and game environment was created using only Python language the low-level parts of physics interactions are written as wrappers in Cython utilizing the cymunk – python port of 2d physics engine Chipmunk2D.
The compiling and installation of the kivy and kivent modules from source codes can be done using the playbook.yml file (using ansible-playbook is an installer program) or getting help from online forums and official pages.
Overview
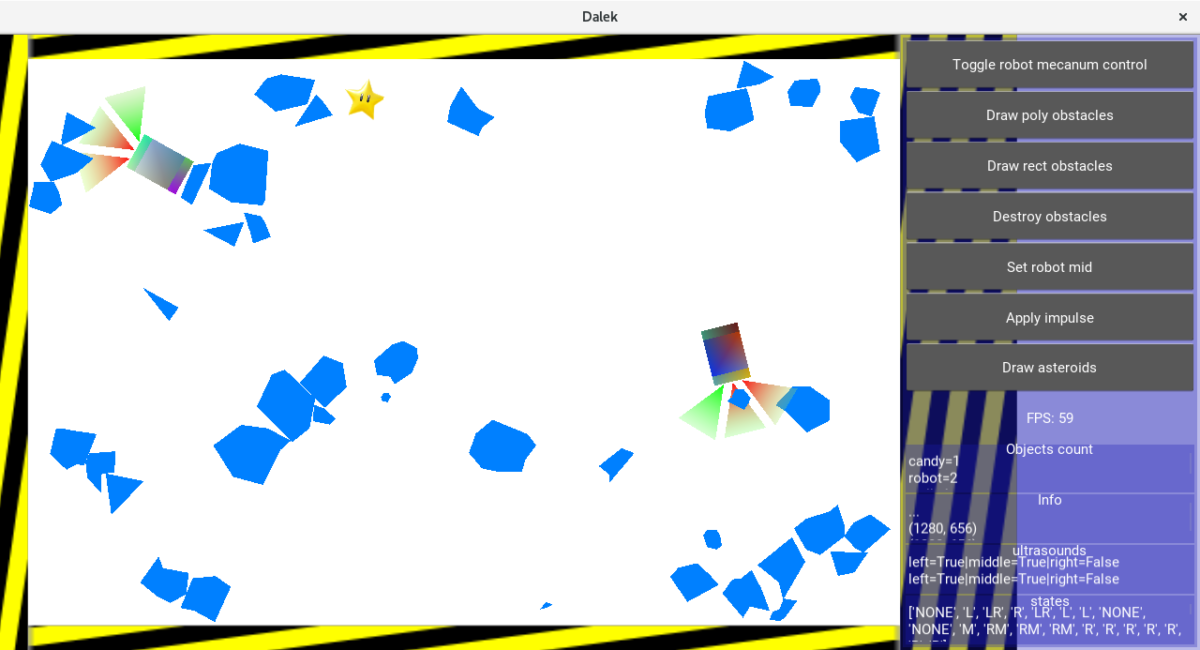
The game-like environment consists of different categories of entities. Static walls around the arena. Randomly generated blue polyonal obstacles and rectagonal obstacles. Candy – the star which represents the target position of the robots. And finally robots which are composed of multiple entities.
Robot entity
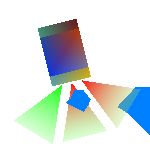 The robot body consists of a colored rectangle representing the physical parts. Then there are 3 colored triangles representing ultrasound senesors sensing cone. The cone color is green, if obstacle, robot or wall is detected it turns red. The robot movement control is simulated as if it has been equipped with holonomic mecanum drive. The simulaiton is described in the chapter Robot control simulation.
Interactive program and GUI
The whole scene is interactive, the user can touch, move and rotate any physical object, but the walls. Objects can be also pinned to the place by a right mouse click. The whole application can be controled via mouse or any touch device with controlling multiple physical entities at the same time on the multi-touch devices (Tested on Dell XPS 15 touch-screen). As kivy and kivent are multiplatform, the krv application can be ported and runned on different devices including operation systems such as linux, windows, ios and Android. The krv can therefore be a great simulation program running on your touch-screen smartphone.
The navigation loop of robots can be toggled by a button. There are also buttons for obstacle spawning and its removal. Info about object counts, current ultrasound states and their history is displayed under the buttons.
Code
Robot control simulation
The robot control is simulated as a holonomic mecanum drive. Overview of different mobile robot undercarriages can be found in this article. In the control loop the robot gets informations about the target in a form of relative vector rel_vec where (0, 0) is the center of robot and its tip is the star position. From the rel_vec vector the normalized vector of wanted direction vel_vec (relative to the robot) and wanted angular velocity ang_vel is calculated in a function goto_target (in robot.py in Robot class).
The wanted vel_vec and ang_vel is afterwards send to the robot control simulation function control.go(). This function recalculates the wanted control into forces (impulses) which are going to be applied to individual wheels.
The equations used are from [1]:
def calc_wheel_speed(self, vel_vec, ang_vel):
    """Simple mecanum wheel control algorithm"""
    vd = vel_vec.length
    th = vel_vec.angle
    dth = ang_vel

    th45 = th + radians(45)
    wheel_speeds = [
            vd * sin(th45) + dth,
            vd * cos(th45) - dth,
            vd * cos(th45) + dth,
            vd * sin(th45) - dth,
        ]
    max_s = max(wheel_speeds)
    if max_s > 1:
        wheel_speeds = [s/max_s for s in wheel_speeds]
    return wheel_speeds
Each wheel impulse is than applied to the robot body, but not at the center but at the wheel position – generating rotational moment. Wheel positions are defined in the corners of the robot and their apply force direction is as it is in the mecanum drive (45 degrees to the rollers axis).
#wheel = [position_of_wheel, vector_when_moving_wheel_in_frontal_direction]
self.wheels = [
        [Vec2d(-w/2, +h/2), Vec2d(+1, +1)], # lf
        [Vec2d(+w/2, +h/2), Vec2d(-1, +1)], # rf
        [Vec2d(-w/2, -h/2), Vec2d(-1, +1)], # lb
        [Vec2d(+w/2, -h/2), Vec2d(+1, +1)], # rb
    ]
The impulses are applied afterwards where imp_value is scalar which represents the power of motors:
for v, wheel_speed in zip(self.wheels, wheel_speeds):
    wheel_pos, wheel_force_dir = v
    imp_vec = wheel_force_dir.normalized() * imp_value * wheel_speed

    loc_wheel_pos = Vec2d(wheel_pos)
    loc_imp_vec = Vec2d(imp_vec)
    [v.rotate(ori) for v in [loc_wheel_pos, loc_imp_vec]]
    #print('wheel_pos')
    #print(loc_wheel_pos, wheel_pos)
    b.apply_impulse(loc_imp_vec, loc_wheel_pos)
Ultrasound simulation
The ultrasound sensors are simulated very roughly as they only gives robot the information whereas the obstacle is inside its sensing cone. The code for distance measurement was not yet designed with stability due to the physics module used.
Robot navigation system
The robot has two sources about the environment. He knows the relative vector of the target from the simulated camera. The second input is 3 ultrasounds which gives a boolean value for each simulated ultrasound sensor.
The navigation step goto_target() is run every 50 ms. Inside the loop the input data are converted into the wanted vector of traverse and angular velocity (as stated in Robot control simulation section). The control loop does contain also a list of previous 20 ultrasounds states. Each time the loop is run the ultrasound states (states list of 3 booleans) are pushed into the states list and the oldest one is popped out. The same principle is applied to the robot velocities whose history is also stored in a list.
The current state is generated from the ultrasound states as follows
dets = self.ultrasound_detections()

LR = dets==[True, False, True] # left and right
L = dets==[True, False, False] # only left
R = dets==[False, False, True] # etc
LM = dets==[True, True, False]
RM = dets==[False, True, True]
M = dets==[False, True, False] # middle
ALL = all(dets)
NONE = not any(dets)
Another set of variables accompanies the current state. is_ALL is true if at least half of the states are ALL. This means at least half of the last 20 step all of the robot ultrasound sensors were blocked. There is also is_NONE and is_M with the similar meaning.
If the robot is stucked, it is detected and a STUCK state is added into the states list. There is also is_stuck if there is any STUCK state in states. Also is_near if the robot is very near the target = 1.2 * ultrasound range. and is_close which is defined as 3 times the near threshold.
The stuck detection is derived from velocity history. If the sum of all velocity vectors in velocity list is below the defined value (stuck_sum) another conditions must be met. The robot must not be near the target (is_near != True) and there must the is_NONE must be also False. The robot should not be considered stucked if there are at least half of the latest states NONE = no ultrasound sensor is sensing anything.
If the robot is not stucked nor the ultrasounds are sensing anything, it just follows the star. This means the robot is going into the relative direction to the target and also orienting itself in the target direction. This can be seen in a video easy from middle.
If the robot is stucked the the target vector is rotated with the stuck_angle, which defaults to slightly more then 90 degrees (110 deg). This is due to the fact the robot may be stucked in a „hole“ or dead-end. This is functional in a way as can be seen in a shallow dead-end avoidance video.
More information can be obtained by reading the code of goto_target() function here.
Disclaimer
Sorry for the code clumsiness I was aiming at the functionality and was learning the kivent module on the run, but though it is mainly without docstrings I tried to be as easy-to-understand as possible. If you want to follow in my path I recommend going through the kivent examples and introduction first.
Non-holonomic undercarriage control can be added with only creating new class for robot control which definitions of functions used by the RobotMecanumControl class.
Sources
[1] Simplistic Control of Mecanum Drive, Ian McInerey, FRC Team 2022 link
[2] Slides and notes from DRE2 subject BUT.